|
|
 |
|
The Main Window
|
|
|
Main Window
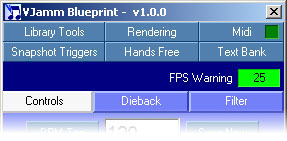
At the top of this window are buttons for accessing the utility windows.
- Library Tools- for managing your libraries
- Rendering- for producing new clips from your output
- MIDI- for assigning your MIDI controls
- SnapShot- for assigning your snapshots to short cut triggers
- TextBank- for managing your text banners
There is a MIDI input indicator on the 'MIDI' button which flashes bright green whenever a MIDI signal is received.
Next is a FPS (Frames Per Second) warning indictor. While producing complex compositions you may start to over-stretch your machine's capiblties.
The Indictor will show:
- Bright green - when there is spare graphics processing power.
- Bright yellow - when there is little graphics processing power to spare, but no frames are being dropped.
- Bright red - when the graphic demands are causing the display to 'slow frame', ie the playback rate is below the target FPS.
VJamm Blueprint will try to play back at the target FPS you selected in the Configuration - Misc Panel.
However, three common causes of 'slow framing' are:
- Using large arrays of complex objects (graphics card over-stretched).
- Using a large number of FreeFrame effects (CPU over-stretched).
- Playing back a lot of high resolution video clips, especially using an inefficient codec (CPU over-stretched).
Below this are buttons for accessing the three global parameter panels.
|
|
|
|
|
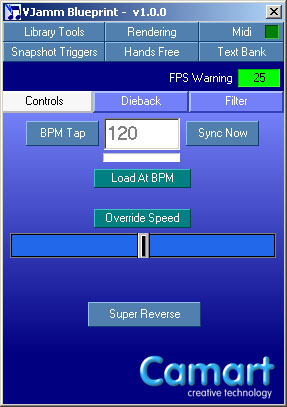
Controls Panel
This panel's primary use is for controlling the overall speed of clip playback.
At the top-center is your currently selected BPM (Beats Per Minute) setting. Double-clicking on this number will pop-up a window where you can type in a new BPM.
Tapping the 'BPM Tap' button 8 times to the beat of the music will set a new BPM.
If you feel that your tapping was not correct then you can stop before finishing 8 taps and the BPM will not be changed. After 2 seconds you can try again.
Pressing the 'Sync Now' button will re-trigger any playing clips causing them all to start simultaneously.
The 'Load at BPM' button toggles the default playback speed of clips when they are loaded into the vision mixer.
- When OFF (default) clips will playback at their default speed.
- When ON clips will have their speed adjusted to fit the selected BPM.
The software attempts to adjust the playback speed of each clip so that either:
- A whole number of bars go by each time the video clip loops
- OR the clip loops a whole number of times each bar
This means that a clip may either speed up or slow down when synchronised, depending on its length and the bar length.
The fastest that a clip can play back is at double speed.
The slider on this panel allows you to quickly adjust the overall playback rate. It adjusts:
- All clips playback speeds.
- All object animation playback speeds.
- All object rotation speeds.
- All surface movement speeds.
TIP: A usefull effect for when the music 'breaks' down.
The 'Override Speed' button above this will be highlighted bright green when the slider has been adjusted. Pressing this button will reset and cancel the override speed.
|
|
|
|
|
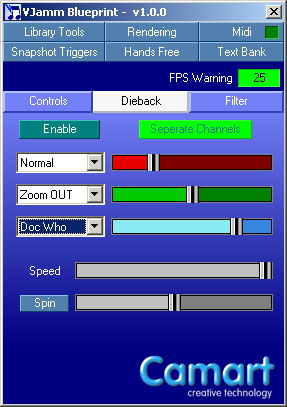
Dieback Panel
This panel allows you to control the way the dieback is produced.
Dieback is the effect of leaving trails which disperse in various ways.
In VJamm Blueprint you can assign different dieback effects to each of the primary colour channels.
The 'Enable' button allows you to toggle dieback on or off.
The 'Separate Channels' button toggles whether colour channels are grouped or controlled separately.
For each primary colour channel, you can:
- Select from the drop-down list the effect type.
- Adjust the strength of the effect using the slider.
When the channels are grouped ('Separate Channels' turned off), any adjustment to one channel will be replicated on the other channels.
Below these controls is a dieback speed adjustment slider, and controls for adding a spin to the dieback effect.
You can reset the spin by pressing the 'Spin' button.
Note: To see the dieback effect you need to have some 'empty' space in your display.
Empty space is where nothing is being drawn - the areas around an object, or transparant areas within it.
When using multiple clips you need to have empty space in each layer so as to allow you to 'see through' all the way to the back of the display.
The transparent area in a channel can be seen in the Parameters Window, where the moving checker board shows through.
|
|
|
|
|
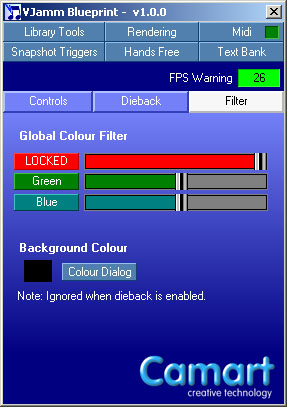
Filter Panel
This panel allows you to apply an overall colour filter to the output.
These controls are defaulted to being grouped - adjusting any one will also adjust the others.
TIP: Using them in default mode you can produce a global fade-out or fade-in.
For each primary colour channel, you can:
- Toggle the channel from unlocked to locked - when locked, any adjustment to the other channels will not affect this channel.
- A slider for adjusting the filtering of this colour.
TIP: If the lights at a show go mostly to blue, you could lock the blue channel and bring down the red and green channels causing your output to be tinted to blue.
For some applications you may want to have a different default background colour.
This can be useful if you wish to render or display something which is going to be chroma-keyed later.
The current background colour is displayed in the box next to the 'Colour Dialog' button (defaults to black).
Press this button to select a new background colour.
|
|