|
|
 |
|
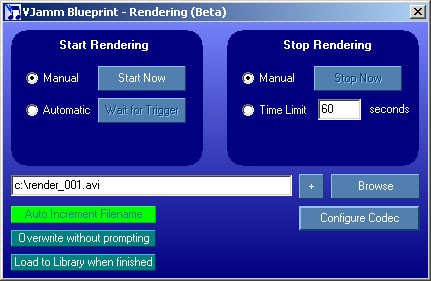
The Rendering Window
|
|
|
|
|
|
This window allows you to record your output to a file.
Only video is exported, audio is ignored.
The resolution (pixel size) and FPS (frame rate) of the output video are the same as the main VJamm Blueprint output window.
These are set in the Configuration Window.
To record your output:
First, set a file name to record to, using the 'Browse' button to bring up a file dialog window.
Next, press the 'Configure Codec' button to select a codec and set it's parameters from the Codec Configuration Window.
You can render out using any codecs installed on your system. However, not all codecs are suitable for VJ use, and so
VJamm Blueprint does not support all codecs for INPUT (ie playback within the software).
If VJamm Blueprint will not be able to play back your
chosen codec, a warning message will show in the Rendering Window.
There are three on/off options which can be toggled:
- Auto Increment filename - if you are making lots of quick-fire renders, to save you from having to create a new filename every time you render, this option will create a filename by appending a number to the output file name.
- Overwrite without prompting - useful if you are making many attempts to get one render just right: this option turns off the 'are you sure you want to overwrite?' warning.
- Load to Library when finished - when you have stopped the render, the newly created clip will be automatically added to the current library.
Starting a render.
- Using Manual Mode - press the 'Start' button at any time to start rendering.
- Using Automatic Mode - press the 'Wait for Trigger' button, the next clip triggered will start the rendering.
Stopping a render.
- Using Manual Mode - press the 'Stop' button at any time to stop rendering.
- Using a Time Limit - before starting a render, enter the required length of time to render for in the box provided.
After starting a Render it will automatically stop after the requested time has passed.
- Using Automatic mode - the option 'automatic stop' will be available when 'automatic start' is selected..
The causes the rendering to stop when the clip which triggered the render stops playing.
TIP: To make a copy of a video clip with effects, use the auto start and stop features, combined with 'play once' mode triggering.
Set up your effects, stop the clip, and click 'wait for trigger'. Then trigger your clip.
Rendering starts with the first frame and ends with the last frame of your clip, and you have a same-length copy with effects.
Note: While VJamm Blueprint is rendering the output display may 'slow frame'. This does not indicate that the render is slow framing.
VJamm Blueprint renders EVERY frame, so playback slows to the speed at which your CPU can compress the video.
On a fast machine, using a small output resolution and a fast compressor (codec), rendering can be realtime, but normally it will be
slower than realtime.
|
|